Cosplay Photo Poses for Beginners with Wearable Props
By the WebShooter Team
Beginner cosplay poses work best when they are comfortable, easy to repeat, and clear about the detail you want to show. Choose a stable standing position, give your hands a deliberate place, and change one small element between photographs. You do not need a stunt or a dramatic location to make a wearable prop visible.
The ideas below focus on static photographs with wrist accessories and chest lights. Keep launching props inactive and follow the rules of the location where you are taking pictures.
Start with a relaxed standing pose
Stand where you can balance naturally, relax your shoulders, and turn slightly from a straight-on position if that feels comfortable. Check that your clothing hangs as intended. Take one reference picture before adding a hand gesture or turning the head.
This first pose gives you something to compare with later. If every photograph starts from a different stance, it becomes harder to tell whether the hand position, camera angle, or clothing adjustment improved the result.
Pose 1: show the wrist accessory beside the torso
Bring the forearm into view without covering the face or the main part of the costume. Rotate the wrist only as far as is comfortable so the casing can be seen. Keep fingers relaxed or use a small gesture that you can hold steadily.

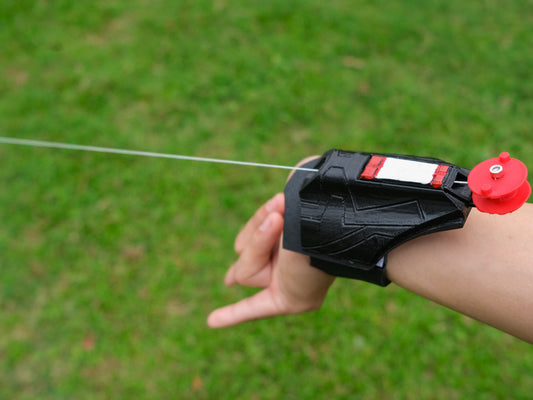
For a cuff with details around the side, such as the Scarlet design shown above, take an additional angle that reveals those details. A frontal view may hide part of the silhouette. Check that a sleeve or glove closure has not slid over the prop.
If the accessory presses against your hand during the pose, stop and revisit the fit. Our wrist-fit guide explains how to check the clothing layer and casing clearance.
Pose 2: make a separate detail photograph
Frame the wrist and part of the forearm against a simple background. Move the camera or the arm until the casing has a clear outline. Keep the launching direction away from people even when the prop is inactive.
Take one picture that shows the face of the design and another that shows how it is worn. The first communicates the style; the second gives context. These images can be useful alongside a full-costume photograph rather than trying to show every detail in one frame.
Pose 3: keep a chest light visible
Begin with the torso facing the camera and the arms resting away from the light. Check that a jacket, lanyard, bag strap, or hand is not crossing the pattern. Then try a small turn to either side and compare the shape in the photographs.

A chest-centered effect can become difficult to read if the torso is turned too far or the clothing folds over it. Adjust the outfit before changing camera settings. If the pattern looks like a featureless bright spot, use our LED prop photography guide to check lighting and exposure.
Build a repeatable four-photo sequence
- Full outfit: show the clothing silhouette and how the accessories fit the look.
- Upper-body portrait: bring the main accessory into a clearer part of the frame.
- Prop detail: show the casing, face design, or attachment position.
- Alternate angle: change a small turn or hand position to reveal a detail hidden in the first image.
Keep the first sequence simple. After reviewing it, choose one change for the next set: a different wrist angle, an open jacket, a clearer background, or a slight camera-height adjustment. This makes the session easier to direct and gives you photographs that can be compared.
Give a photographer concrete instructions
Instead of asking only for a “cool photo,” explain what needs to be visible. Useful directions include “please include the whole cuff,” “keep the chest-light pattern clear,” or “take one wider frame before the close-up.” Agree on a cue so you know when to hold still and when to relax.
If you are photographing yourself, use a stable support and the camera's timer where available. Check the frame before starting the pose, and keep your attention on a safe, clear area around you.
Choose space where posing is welcome
Ask permission where needed, respect other people's space, and keep paths and exits clear. At a convention, follow staff instructions and ask before including another attendee in a photograph. A prop's visual effect never requires firing it across a crowded room.
For clothing ideas, try our closet cosplay guide. For choosing an accessory, compare five web shooter styles or explore the arc reactor collection. Settle the outfit and fit first, then use a small photo sequence to show the result clearly.